Friday, October 19, 2012

Tailored Jacket -- Simplicity Pattern 2150 View B

So I started to teach classes at my local Jo-Ann store for some extra cash and just to have a sewing outlet.  I was asked to teach the Sewing 301: Out and About class.  I got the pattern looked at the instructions and decided, that I better run through this first before I try to teach someone how to make this jacket.  The directions aren't hard, but I get confused easily... or maybe that's the result of trying to sew between the hours of 9 pm and 1 am after work in for 8 hours and trying to fight to get 2 or your 3 kids to bed starting at 6:30.

Anyway... So here is my review of:


Time to complete from cutting pattern to final seam: approx 8 hours so actual sewing and cutting time
Time it took to figure out some of the pattern: 2 hours
Time it took ripping out what I did when I wasn't that awake:  Lost track after the  4th seam
Cost to make: $1 not including materials I already had at home, I already had fabric

Materials
Materials per the envelope:

    • Fabric:
    • Microsuede, Denim, Corduroy, Damask, Pique, Poplin, lace, and it goes on and on, so pretty much anything will work.
    • 3/8 yard light weight interfacing of 20" to 25"

    • Notions
      • Thread
  • Materials that I used.
    • Fabric:
      • Maybe 2.5 yards of micro suede that I had left over from a back seat car cover
      • a 6" by maybe 8" if that piece of light weight interfacing
    • Notions:
      • Thread
    • Tools
      • Topaz 30 sewing machine
      • Brother 1034D Serger (Started on there b/c my machine was getting serviced)
      • Chalk pen/Air soluble pen
      • Seam ripper (I made a few mistakes)
      • Spray adhesive
      • Straight pins, if using micro suede make sure that they are crazy sharp other wise it will snag the fabric

Let the construction begin....

       But not too fast.....

           Things to figure out before you start:

  • Pattern Size:
    • Figure out what size you need. Unlike many Simplicity patterns, this jacket is very form fitting.  I usually will use a combination of bust size,waist size and finished pattern size.  Since my bust was one size and my waist was another I measured all of the pattern pieces at the waist to make sure that it would be big enough.  Then remembered that it's not that important since it's an open jacket.  Something that I forgot to check was how long the jacket was from neck to waist line.  I have a long torso so this jacket fits me funny so I will probably give it away or sell it.
  • Seam finishing:
    • This is an unlined jacket so you will need to finish your edges.  I chose to use a french seam.  I will create another blog on various was to finish seams.
  • How you want to sew on the arms
    • This may seem like an odd thing to say but if you choose to follow the pattern you will sew them on using the round method (you sew around the arm hole) or the flat method (you sew the side seams last).  I will do a blog on both of these methods.  Each has it's benefits and disadvantages.  If you choose to do the flat method you will skip steps in Step 4 until the end.

The Pattern:


This pattern is fairly well explained and I"m being lazy so I don't feel like doing a step by step, so I'll just highlight my complaints/quirks/helpful hints.

Construction:
As stated in the pattern this is an unfinished jacket.  So you will need to determine how to want to finish your edges.  This is important to figure out before you start because if you decide to do a French Seam you will construct the jacket inside out then go back to put the seams on the inside.  I'll do another blog after this one to go through all of the various ways to finish a seam.  Note to self put link to seam finishing blog here. 

I did mine with a french seam.

Ok... now that all of my side notes are done lets start sewing....

So first 2 steps pretty simple (Step 1 and 2a).  Stay stitching.... I can handle that.
Then I got lost (1st set of seam ripping).


So you have 4 of piece #10, the flap thing... they decided to call 2 of them together the "Front and Collar" and the other two as the "Front and Collar Facings"... great... something so similar that when I don't do a good job reading b/c I'm not really awake I"ll get confused.

So to translate for us sleep deprived people.  You will stay stitch the notches.  Then however you cut the 4 pieces of this out you will sew the top part together so that you wind up with the pictures below:
Front and Collar Facing (Step 2)

Front and Collar with Front Sides attached (Step 3)
Not a hard concept, but it took me a while to figure that one out... Like I said I sewed this half asleep.
Then you jump to View A Steps 4 to 6, which is attaching the "mini belt" to the center back and sewing the back panels on.

Step 4:  Piecing the Front and Collar with Front Sides attached (Step 4) to the back.
This was way easier said than done.  Mostly because of the odd way that Simplicity had to "notch" the flap parts to contort it around the collar.  So after my glazed starring at the pattern, then my fabric, then the pattern, then a scratch on the head, then the pattern, I figure out that the easiest thing to do is to start in 3 different sections.  Start at one of the arm holes, pin unit I hit the notch.  Then start in the middle of the neck and go to one side until I get to the notch, lining up the two ends as I go along.  Then repeat on the other side.  My seam notches that I cut in the fabric weren't lining up b/c I didn't take in enough fabric when I sewed the Front and Collar together I had to make another seam on both the Front and Collar and Front and Collar Facing to take up some of the slack.


How to put in Grommets/Eyelets into Fabric


Grommets or eyelets are often used as either decoration or as a well to tie things together.  It could be something fancy like a corset or something simple like a curtain.  I was talking to someone and they were unsure how to put one in, so I decided to do a blog on it.  It is really simple to put a grommet or eyelet into fabric. I extracted out this out of my Rapunzel dress posting.

Tools needed:
  • Hammer
  • Seam Ripper
  • Air Soluble Pen/Chalk
  • Eyelets
  • Eyelet tool
  • Hard surface (and something to protect it if using table)


 1) Determine where the Eyelet needs to go.  I took my pattern and put it on my ironing board w/o the cover on.  I used a ball point pen to poke holes in the center of all of the circles on the pattern to indicate where the eyelets need to go.


2) Transfer all of the marking by putting either a chalk mark or an air soluble pen  by lining up the pattern onto the front of the bodice and draw the mark onto the garment.


3) Use a seam ripper to carefully make a small tear through all of the layers that is just big enough to put the eyelet in.  If your not sure enough how big to make the slits, line up the center markings on the side of the ring part.  Use chalk or an air soluble marker to trace the inside of the ring.  Make sure that your cuts are small than the ring.
 I recommend making the slit vertical (neckline to waist) to prevent the fabric from running.  If it's a larger grommet make an "X" pattern so that it's easier to get through.  Since this is a 1/4" grommet only one direction was done.
If you want you could apply fray check to the fabric before you put the eyelet through the bodice to make sure that the fabric won't run/fray or get bigger.  This is esp important if you are using a fabric that is known to run like this satin that I was using.
4) Put eyelet through the hole that you just made.  Make sure that you put the side that has the high side through the fabric, not the ring.

5) Put eyelet tool onto a hard surface.  I used my kitchen table, with a magazine under neath it so that I wouldn't dent my table.

6) Put the ring onto the eyelet and place the long part of the eyelet tool onto the eyelet.


 7) Hit the long part of the eyelet tool with a hammer until the tube part of the eyelet has folded over onto the ring.
8) Repeat as needed.  When you are done you will get something that looks like this.  I was using a satin, so mine puckered a little because I did not make the slits large enough on some of the holes.  I just left it b/c it would be stretched out a bit.  Cottons will not pull like the Satin did.  Just the nature of the beast.


And that is all it took....to put in grommets or eyelets into fabric

Tuesday, October 2, 2012

Clutch...well sorta-Simplicity Pattern 2166

So I decided to teach sewing classes at Joann's for some extra cash and for some sanity and purposeful, mandatory sewing.  I already taught my first class.  I think that it went OK.  It was a knit top on a straight stitch machine (I prefer to serge knits, so much easier) that came out... well I'll just use the word interesting.  The pattern had all sorts of issues.

Anyway so on the November/December class schedule, one of the classes is to make a clutch using Simplicity Pattern 2166 view D.  The Education Direction wanted me to make a sample clutch and snowman blanket up so I did.  This is my review of the Clutch Pattern.

Finished Clutch.  It's actually a slate blue.  The photo grays it out.

Simplicity Pattern 2166 View D

Overall it's an easy pattern, pretty straight forward.  After making this one there many many things that I would do different to make it cuter and nicer.  I'll point those out as I go along in GREEN.  and little tips and tricks of mine in purple.  The bag came out WAY bigger than any clutch should ever be.  Mine is smaller than what the pattern says at 7.5" high by 11" long and I could fit a note book in there.  If I make it again I would shrink the pattern down by about 75%


Just a few things before we start.  
Time to complete from cutting pattern to final seam: approx 2 hours.
Time it took to figure out trims: about an hour (what can I say I can't make a decision)
Time staring at the pattern trying to figure out how to make it easier: approx 2 hours
Cost to make: $10 not including materials I already had at home


Materials

  • Materials per the envelope:
    • Bag (i.e. Clutch)
      • 5/8 yard 45" or 60" fabric
      • 1 yard Heavy Weight Fusible Interfacing
    • Lining:
      • 5/8 yard 45" or 60" wide fabric
      • 1 3/8 yard 20" to 25" light weight interfacing
    • Notions:
      • Ribbon 3/8 yard of 3.25" and 2.25" wide ribbon
      • Magnetic snap
      • Thread
  • Materials that I used.
    • Bag
      • 5/8 yard polyester taffeta
      • 1 yard of Ultra Weight fusible interfacing (not a good idea... I'll get into that below)
    • Lining:
      • 1 yard of satin remnant I found for 50% off, have some left, so didn't use full amount
      • don't know how much interfacing.  I have a giant wad of 60" wide that I got for $1 a yard in downtown LA a few years ago.
    • Notions:
    • Tools
      • Topaz 30 sewing machine
      • Brother 1034D Serger (Started on there b/c my machine was getting serviced)
      • Chalk pen/Air soluble pen
      • Exact-o knife
      • Pinking shears
      • Seam ripper (I made a few mistakes)
      • Cutting mat
      • Spray adhesive
      • Straight pins
      • fabric glue
      • pen/pencil/marker
  • Things that I should have used to make my life easier:

Let the construction begin....

The Pattern:

- It was easy enough to figure out my piece and to cut out the fabric.  I use spray adhesive to put my pattern pieces down for a number of reason, but on satin fabrics, esp, the spray adhesive is great b/c you don't get pulls in your fabric from the pin holes from tacking down the pattern. 

- Transfer all pattern marks onto fabric.  Normally I'm not one to do this, but for this project it helped so much to take this time because you have to align all of the interfacing, pocket folds and clasps.


- I cut the pattern out per the direction but I did a few things different.
  - I cut the Ultra Weight Interface 5/8 inch small, which is basically the seam line that is outline on the pattern.  This made it easier to "wrap" the fabric around the interfacing when it came time for assembly and removed the bulk of the interfacing from the seams.
I also cut about 1.5 inches off the top part of the interfacing for the flap, because since the interfacing that I choose was so stiff it would not lie nicely if there was interfacing all the way to the edge.  Also, I only cut out 1 Interface for the flap of the bag, b/c I felt that 2 layers would be too rigid and too hard to flip inside out.  I was right...
  - Next time I would cut out and apply light weight interfacing to the top/front flap.  It would make adding the ribbon easier.  Otherwise you may get the ripple pattern like I did.  If you like the ripple pattern than add about an extra inch to the bottom of the front flap so that you have enough fabric for a good seam allowance when you sew both sides together.

Pre-Assembly:
- Apply Fray check to one side of the Lining and the top of both pieces of the flap and to the bottom of one of the pieces of the flap.  These areas will fray and become a pain in the tail
-  Apply all of the interfacing per the manufactures directions.  Usually use iron on cotton setting with damp towel applied to interfacing size for 15-20 seconds until glue melts.  Then use dry iron to remove excess moisture. (Simplicity Steps 1, 6, and 25)
If I were to make this next time I would try to find Heavy weight interfacing for the bag b/c it will be easier to sew in the long run.  The Ultra weight is nice b/c it give the bag some shape, but a pain to work with and I'll point that out as I go along.  If you want a more rigid bag, than cut the ultra heavy interfacing into a rectangle so that it is not on the sides of the bag.
- Apply the snap to the dot per manufactures directions.(Simplicity Steps 2 and 28)
This is a great video that I found for the magnetic snaps (EverythingMary.com) on how to put them onto your bag.  I also added a drop of glue over the cuts that you make in the fabric b/c I know that satin type fabric are known to pull and make runs, so a little drop of glue takes care of that.


Assembly:

I started out on my serger b/c my Topaz was in the shop getting serviced.  It wasn't bad to sew on the serger until it came time to have to sew the flap onto the bag.  So I had to wait to get my Topaz back.
Anyway....
Inside of bag
Assembly is pretty straight forward...so you think.  Just follow the directions per Simplicity for the first few steps.  
1. Sew the side seams of the bag, then make the box seam along the bottom. (Simplicity Steps 3, 4, and 5) 
2. Then sew the pocket onto the lining, then sew the lining the same way you did the bag. (Simplicity Steps 7,8,9) 
Since I forgot to sew the pocket into the lining and since I didn't have a straight stitch machine I did it by hand.  The down side was that it took forever (not counted in my time it took), on the plus side I was able to hide all of my hand stitches.  The pocket in the back is split, but you don't see the seam on the outside.
The Simplicity directions then say to attach the lining to the bag, turn inside out and hand stitch closed.  Then make the flap.

****This is where I would deviate if I were to make the bag again.****
Based on the Simplicity directions when you attach the flap to the bag you will get two seams showing on the inside of the bag so I would. (see black thread in picture).  So to avoid that this is what I would do
1. Sew the trim onto the top flap (Simplicity step 26/27)
(see another section below about that one)
2. Sew the top/front flat to the bottom/back flap (right sides together) per directions (Simplicity step 28)
3. Flip inside right side out (Simplicity step 29)
4. Attach to bag per Simplicity Steps 39 and 40
5. Attach lining to bag per Simplicity Steps 9 and 10.  You'll have to do some major crumpling of the bag and front flap to get it all to fit but it will be worth it not to have those pesky lines around the inside of your bag.
(this is why you want to fray check your lining edge.  My lining un-raveled about 1/4")
6. Whip or ladder stitch the seam closed per Simplicity Steps 10 


At this point you should be done.  YOU DID IT!!! YAY!!!!!!
.... but don't celebrate too soon.  

I found that my lining kept popping out so I ran a straight stitch around the edge about 1/8" down from the top to hold it in place.

Now your DONE.  YAY!!!! 

****So a side note on the front trim.*****

I came across a happy accident.  I had to tack down the trim that I bought and didn't want to just use a small zig zag to hold it on.  The edge of the trim was pretty blah.  So I looked at the decorative stitches built into my machine and found a cute crows feet so I decided to use that.  Well since I didn't stabilize my fabric and it's just cheap polyester it bunched and got all nasty.  I was going to rip it out but didn't feel like it so I just did the other side.  Well it make this super cute ruching on both sides!!!!  Unfortunately, you can't see it that well any more b/c I really had to stretch my top layer to meet the seam allowances, but if I made this bag again I'd do it the same way but leave about 2 inches of extra fabric on the bottom so that I could have the ruching on the front.


and that is all it took... to make a satin clutch!!!


You can also find a truncated review here.

Friday, August 17, 2012

Rapunzel Dress - Simplicity 2065

I will be a good child and once I get settle actually post all of the picture for the Rapunzel Dress that I made for a friends daughter.
But until then here is the finished project.

Update.... As promised here is the photo step by step for:
(This is your warning that there are ALOT of pictures below)


I made this for a friend daughter for her birthday.  Since I made a Belle Dress for another friends daughter I was itching to make another dress, and since my two oldest (4 and 2) are boys I need to find another... victim... well.... spoiled girl...  It was a payback for him getting us an electronic toys that made way too much noise.  A dress that his daughter wouldn't take off would be perfect.  She was already in her princesses phase and didn't want to wear pants so they were running into lack of dress and tight issues.


As you can see from the picture the movie Rapunzel dress (left) is very very different from the Disney Princess Dress (Right).  So even Disney doesn't stay consistent.

Anyway this dress is super cute, but not a movie replica.  
But it does look similar to the one that the Rapunzel wears around the Disney Parks
(I do not own either of these images.  I found the thru a Google search)

Ok so lets get started...

Before I even start sewing, I read reviews online at sewing.patternreview.com.  From the reviews I found out that the bodice runs small and the dress runs long.  So knowing that I am able to plan my yardage out and pattern pieces.  I made this dress for a small 3 year old for her 4th birthday, so I made the dress to fit a 4 year old.  So to make sure that I had enough yardage I got enough materials to make the dress for a 5 year old.  Keep that in mind when I list out the yardage for the fabric

Cost and Time
Cost for materials.  About $50, bought most of it on sale at Joanns or in the clearance section when it was 50% off.  had somethings at home already.
Time took to cut pattern and construct: 3 days, sewing about 4 to 6 hours a day
Time it would have taken if I didn't have 3 kids pulling my attention else where, 12 hours
Reaction when girl got it... worth all the time in the world

Materials
Per Package
      Fabrics:
  • Dress: Satin or Sparkle Satin
  • Overskirt and Lower Sleeve: Organza, Chiffon

  • Per the package
    • Dress Bodice - 3/4 yard of 45" wide fabric
    • Dress Skirt and Insert - 2 3/8 yard of 45" wide fabric
    • Overskirt and lower Sleeve - 2 5/8 yard of 45" fabric
    • Lining and slip - 2 3/4 yard of 45" fabric
    • Slip Ruffle - 1 3/8 yard of 54" wide net
    • Interfacing - 1/2 yard of 20" to 25" lightweight fusible
    • Lacing - 2 5/8 yard of 1/4" wide ribbon or rattail
    • Ribbon for Sleeve - 3 5/8 yard of 3/8" wide ribbon
    • Lace for Neckline, Sleeve and Bodice - 2 1/8 yard of 3/4" wide
    • Trim for Skirt - 4 1/2 yard each of 1" wide novelty sheer ribbon and 1/2" wide braid

    Notions:
  • Thread
  • one 14" zipper
  • hook and eye
  • ten eyelets
What I used:
   Fabrics:
  • Dress:
  • All my fabrics and trims
    • Skirt and Bodice: Light Purple Satin
    • Bodice insert and Upper Sleeve: Med Purple Satin
    • Overskirt: P re-embroiderered organza
    • Lower Sleeve: Leftover light purple organza from another project
    • Lining and slip: Lining material from Joanns
    • Interfacing: random interfacing that I had gotten from Downtown LA from another project
    • Lacing: 1/8" wide spool of $.50 ribbon from Joanns
    • Ribbon for Sleeves: scraps from the light purple fabric
    • Lace for neckline and bodice: lace trim from Joanns
    • Trim from skirt: Purple flower trim from Joanns
  • Notions:
    • Thread
    • 14" invisible zipper
    • Hook and eye
    • ten eyelets that I had left over from another project
    • 1/8" satin ribbon for lacing
  • Tools:
    • Topaz 30 Sewing Machine
    • Brother 1034D serger
    • seam ripper
    • Hammer
    • Eyelet tool
    • Air soluble pen/chalk
    • Temporary Spray Adhesive (505 Adhesive)
    • Satin or fine straight pins
    • Microtex Sewing Machine Needles
Dress Construction:
Overall the pattern is not that hard to follow.  If I were to make this dress again I would tweak a few things, like when I add the sleeves since I decided to finish the sleeves rather than leave the edges raw.  I also used ALOT less trim.  I did a roll hem on my serger to finish the sleeves (both upper and lower) and the use of the pre-embroidered fabric saved me from having to finish the bottom of the skirt.  I'll put all of my tips and trick in pink as I go thru this.

So lets begin.
Pre-construction (i.e. pattern reading, cutting pattern, interfacing, etc.)


A) I like to reuse my patterns, often in a different size, so I traced all of the pattern pieces onto paper.  I have been using HP Velum for a wide format printer.  It works well because it is thicker than pattern tissue so it's easier to work with and doesn't tear as easily. On the downside, since it is thicker you need to have a solid WHITE background under the pattern to be able to see the lines to traces.  So I just use a piece of the paper under the pattern than trace.


 B) For some reason simplicity gave me the directions in French, after a quick e-mail to the company they e-mailed me the directions in English. Much easier to understand.  If this happened to you and you need the English one.  I have them here for you.
English Instruction for Simplicity Pattern 2065

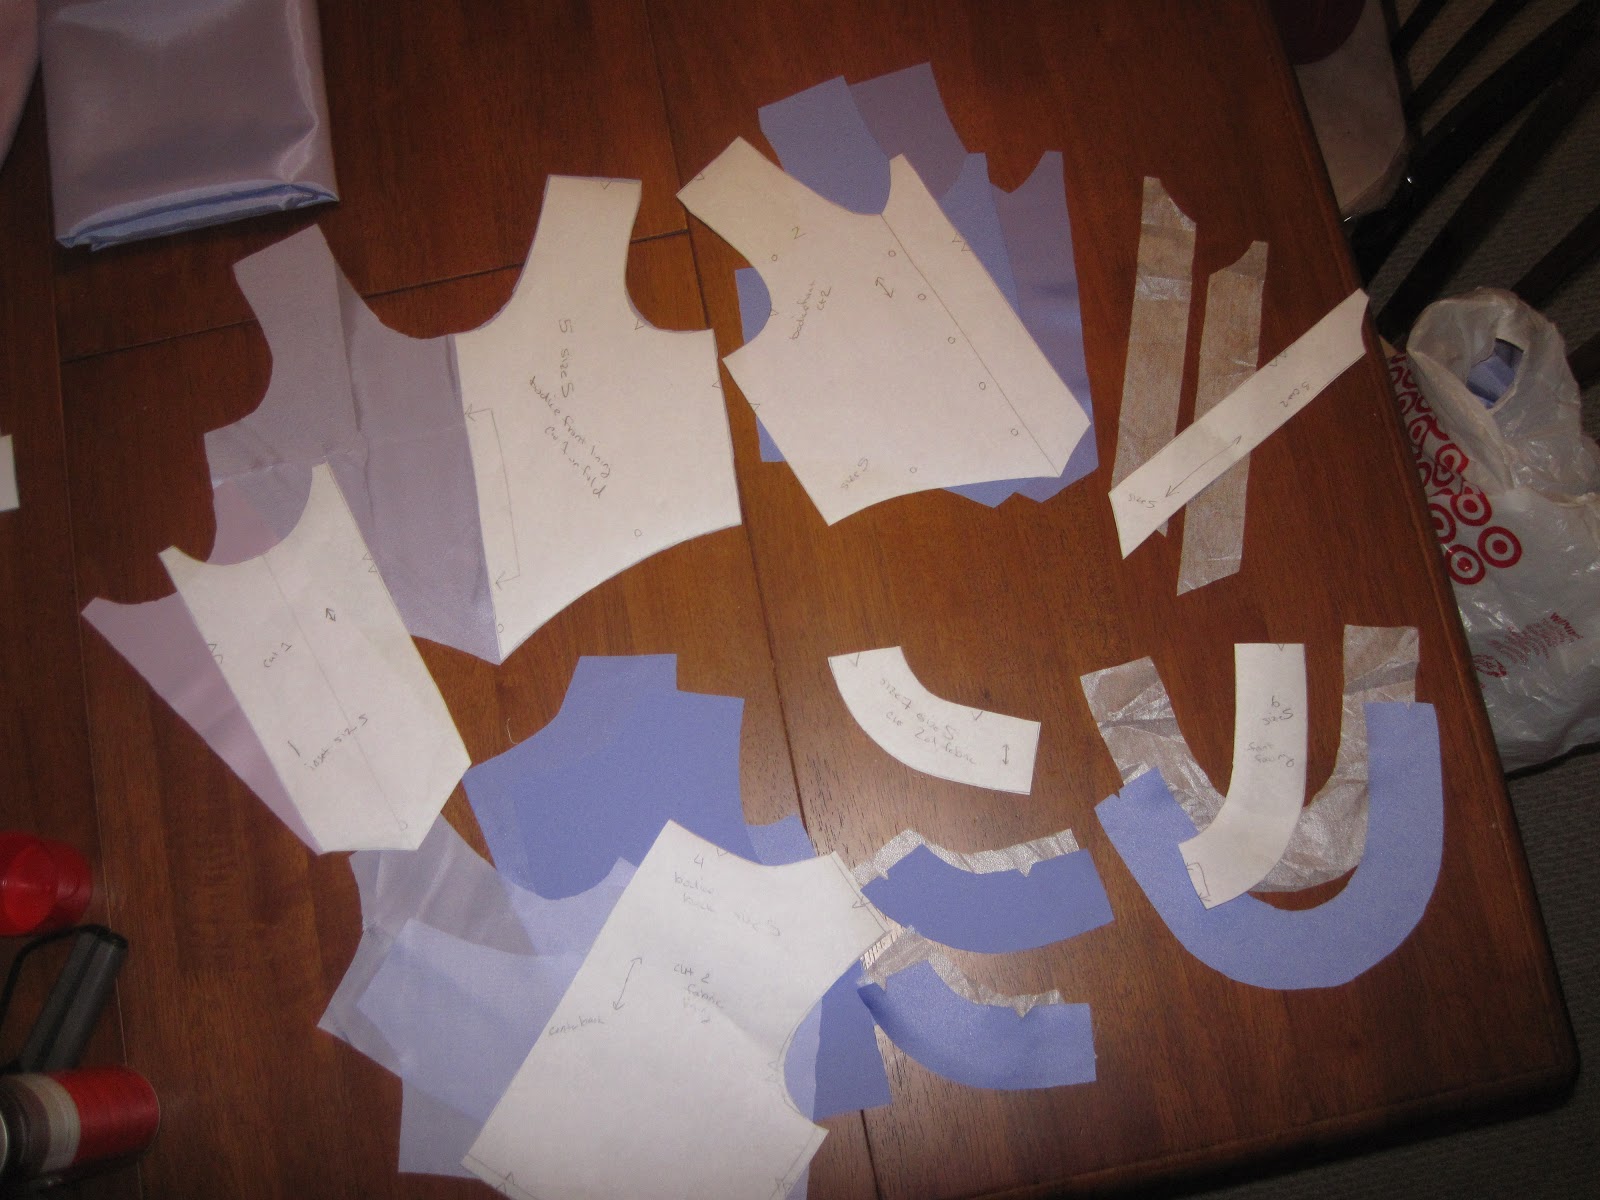
 C)  I rarely follow the pattern to how the pattern pieces should be laid out.  I find that it makes way to much waste.  So here you can see how I laid out some of the Skirt and Top insert patterns pieces on the fabric

Tip: 
I found that when working with satins and fabrics that pull easily the easiest thing to do is to use a temporary spray adhesive, like 505.  Spray the Pattern Piece with 505 and stick them to the wrong side of your fabric.  It's great because you don't have to worry about your pattern moving while your trying to cut it or the fabric moving when you are pinning it.  Also it prevents pulls and snags in the fabric from any burs on the straight pins.  Another plus is that the pattern piece stays with the fabric so that you don't have to worry about not knowing which piece it is.


E) Here are all of the pieces of the bodice cut out along with the interfacing cut.  The Interfacing is cut out the same way as the pattern pieces.  Interfacing helps keep the fabric from pulling.  For satins it is used in places where a garment needs reinforcing because that area will be rubbing again the skin, or has a unique technique done it it.  For this dress it's keeping the dress front down as well as keeping the satin from running where the eyelets go.

F) Apply the interfacing to the collar with using the manufactures direction.  The part of the interfacing that should touch the fabric is the side that has little bumps on it.  That is the glue that melts from the heat of the iron.  If your interfacing doesn't have any directions, you can typically apply it by pressing a damp cloth over the interface side with a iron set to the cotton setting.  Then remove the iron and iron the fabric (dry) to remove any excess moisture.
Tip:
I typically apply all of my interfacing before I start construction so that I don't have to stop part of the way thru and set up the iron again.

G) Apply interfacing to inside of the bodice by lining the points and flat sides with each other


Dress Construction

Bodice

Note: Numbers correlated to Simplicity Directions
          Letter are extra steps I've added

1. Stay stitch the front inseams.  You can see the stay stitches in the picture.   I just use the default stitch length that my machine sets up for light weight woven fabric (around 2.5 mm I want to say)
For those not familiar with stay stitching, it's important to go from the direct as illustrated in the picture because as you sew the fabric wills stretch.  If the garment is to stretch it's better to have the extra material in the direction that the illustration shows.

2. Apply interfacing: Already completed above

3. With right sides together sew along edge and press seams so that front of dress lies flat.  Repeat on both sides until you get something like the image below when opened up


Step 4:

 4a) Once step 3 is complete you need to fold the purple side so that the curve on the bottom is unbroken.  I did this by folding the side parts along the interface line then putting a pin at the top and bottom of the seam lines. 
4b) When both sides are folded along the interface line flip the bodice over.  Fold the side along the seam line and pin in place.  Note, they will not meet in the middle.                                               4c) Use a long basting stitch and sew the flaps do the bodice at the top and bottoms


Adding the Eyelets (still step 4):


Tools needed:

  • Hammer
  • Seam Ripper
  • Air Soluble Pen/Chalk
  • Eyelet tool
  • Hard surface (and something to protect it)


 4d) I took my pattern and put it on my ironing board w/o the cover on.  I used a ball point pen to poke holes in the center of all of the circles on the pattern to indicate where the eyelets need to go.


 4e) Transfer all of the marking by putting either a chalk mark or an air soluble pen  by lining up the pattern onto the front of the bodice and draw the mark onto the garment.


4f) Use a seam ripper to carefully make a small tear thru all of the layers that is just big enough to put the eyelet in.  I recommend making the slit vertical (neckline to waist) to prevent the fabric from running.  If you want you could apply fray check to the fabric before you put the eyelet thru the bodice.
 4g) Put eyelet thru the hole that you just made.  Make sure that you put the side that has the high side thru the fabric, not the ring.

  4h) Put eyelet tool onto a hard surface.  I used my kitchen table, with a magazine under neath it so that I wouldn't dent my table.

 4i) Put the ring onto the eyelet and place the long part of the eyelet tool onto the eyelet.


 4j) Hit the long part of the eyelet tool with a hammer until the tube part of the eyelet has folded over onto the ring.
 4k) Repeat for each of the 10 marks.  When you are done you will get something that looks like this.  Even mine puckered when I put the eyelets in.  That is a result of not having a large enough hole that the eyelet went into.  I preferred the pucker than to having HUGE runs in the fabric or a hole that is too big.  Plus when it's worn you can barely see it anyway.

5)  Simplicity says to: line the top of the front of the bodice with the back of the bodice at the shoulders and sides and stitch in place.
Suggestion:
This is where if I were to do this again I would deviate.
Instead of sewing the top of to the back at the shoulders and sides, I would just sew them at the top.  Then I would jump to Simplicty Step 26 in attach the arms.  Why do you say.... I have found that it's easier to not sew the sleeves together and just sew the sleeve tops to the arm holes.  Then right sides together line up all of the outside seams and stitch closed.  The benefit is that you don't need to have a free arm sewing machine, and all of your under arm seams will line up correctly.  I constructed the dress as the Directions said and boy was it ever a pain in the neck.  For this blog I will follow the Simplicity directions.

6) I pined the lace onto the bodice 5/8" from the bottom.  At the chevron at the bottom of the bodice I kept the "solid" part of the lace along the line and folded the lace up so that it made a point.  Once the lace was sewn in place and put down the fold went away and made a nice point at the bottom.  As you can see from the picture on the left  I centered my needle just to the left of the solid part of the lace.
and now for the...
Skirt
This does make a very full "Princess Skirt".  If you wanted it closer to the movie you could just use one of the back panels and cut a slit in the middle for the zipper.  When I did this dress I was going for that "Disney Princess" Full ball gown feel, not movie accuracy, so I used both back pieces.  Note I made the skirt out of order that Simplicity states.  You can do it either way but this is what I did.  Remember the numbers as Simplicity Step numbers, not the order to sew this in.
12) Sew stay a stay stitch at the chevron of the front section of the dress.
13) As stated in the directions, I pieced all of the skirt pieces right side together, giving you a big circle of fabric.  Sew with a 5/8" seam allowance
14a)  I used a serger to finish the bottom of the outer skirt so that it would not fray.  knowing that this mad a very long skirt I knew that I would not need to do a narrow hem as the directions state.


14b) I measured 2 inches from the bottom of the skirt and pinned in place.
14c) I did a blind hem on the skirt so that I wouldn't have to tack it up by hand and also so that there wouldn't be a thread line 2 inches up from the bottom of the skirt.  So to do a blind hem on the machine you pin the skirt as in 8b, then you go back and fold the skirt under (right side down) and re-pin it with just the serged edge showing.  I'll have to do another post just on machine blind hems.  Once you figure it out (it's not hard) you'll wonder how you ever did with out it


14d) On my Viking the blind hem foot is foot "D" as seen in the picture on the left.  The fold goes up against the slit.  You use an altered zig-zag stitch (picture on right) that will sew mostly on the fabric that is on the right of the stitch and make a little stitch that will catch the fabric on the left.
When you are done, fold the folded edge back down and press.  On the outside it will look like the picture below.


Over Skirt
Since I used a pre embriodered fabric I tweaked the pattern a bit for the over skirt.

7) If you are using non-embroidered fabric you would sew all of the over skirt panels together at this point.  Make sure that you don't sew the front closed as this has a open front.
8) You would also do a narrow hem on the bottom, Since I am using a pre-embroidered fabric, it was not necessary.   Just remember to make sure that the over skirt is the same length as the skirt.  It will be pain to have to hem it later, since you will have trim on it.  Also if you are using a wide trim on the bottom, don't drive yourself nuts by trying to make a nice neat narrow hem, it will be hidden by your trim.

8 alternate) Using a pre finished edge fabric, like the one I did
Cutting:
I lined up my patterns and cut my over skirt from one continuous piece to avoid seams and having to piece the bottom together.
To do that I just lined up my back piece (1/2 of skirt back) and side piece, folded my fabric in half parallel to the cut line.
Since the bottom of my over skirt is embroidered I moved the fabric up 2 inches from the bottom (same as the hem on my underskirt) and cut the fabric out.  No sewing of skirt pieces needed

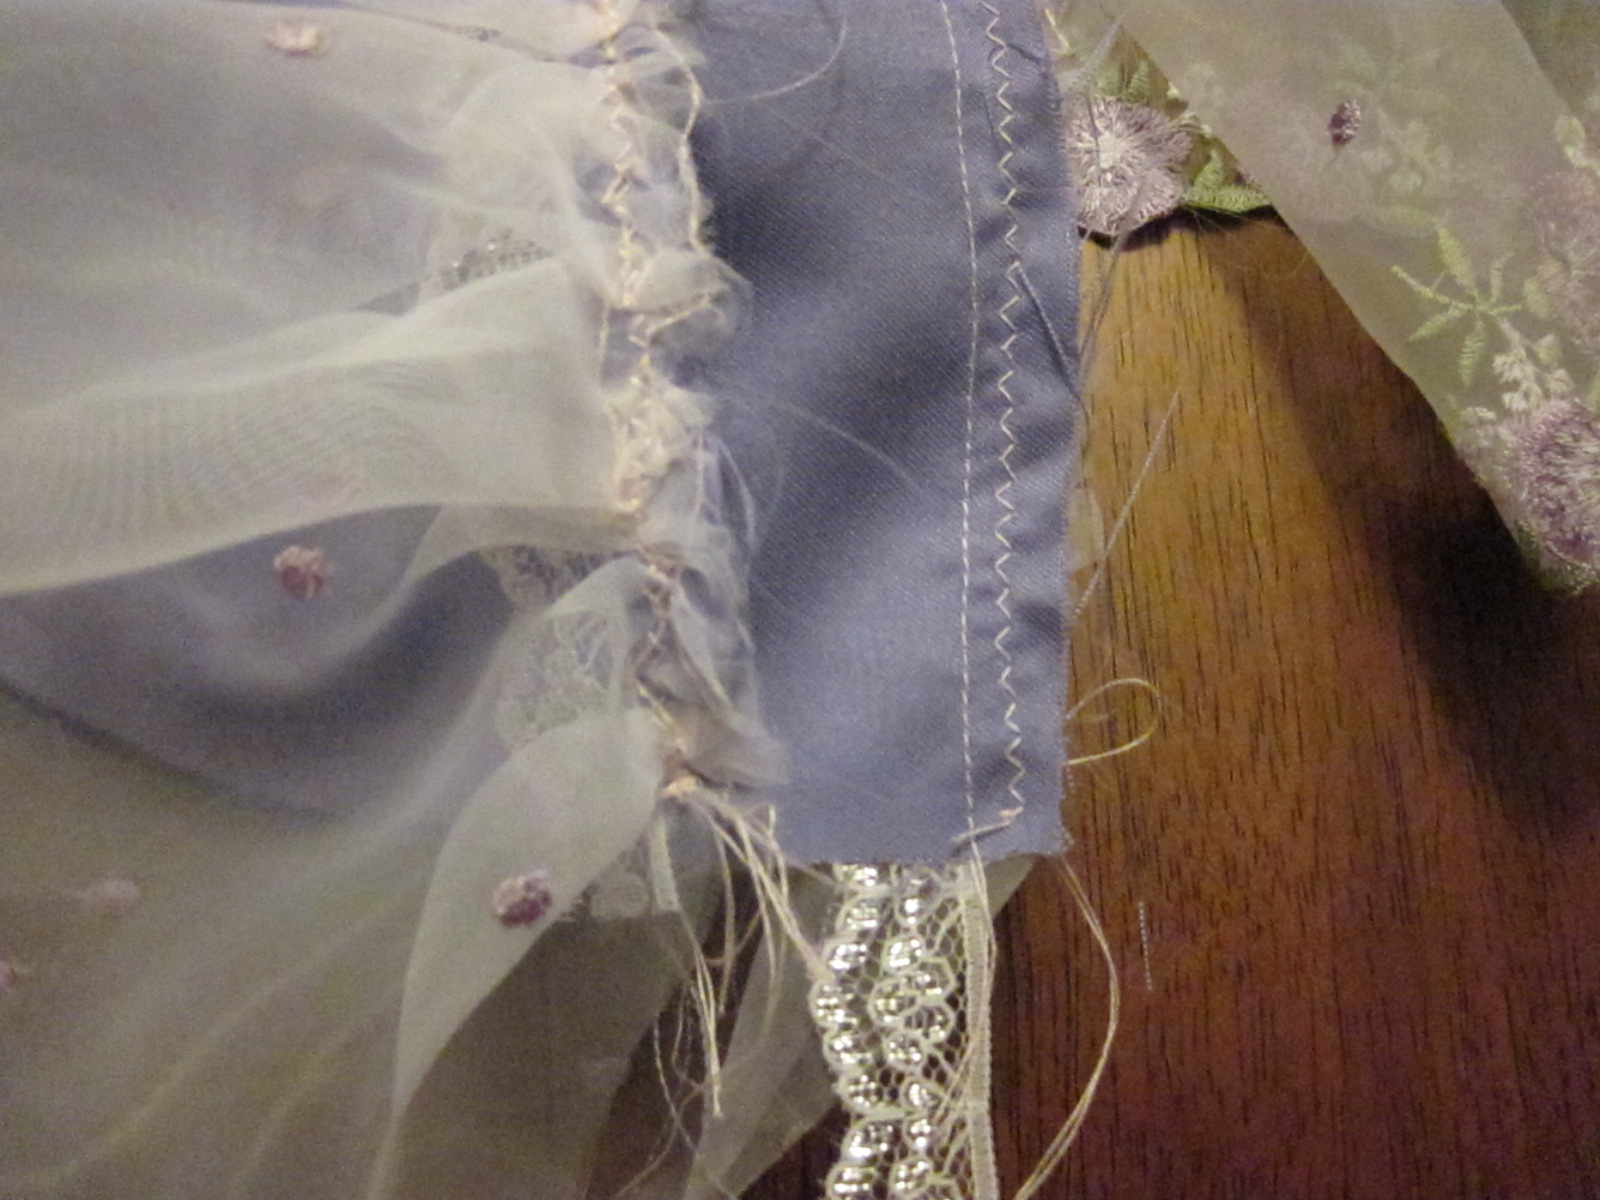
9) As you can see from the picture I finished the overskirt by running it thru my serger so that it wouldn't fray.  Since the trim covers the edge it doesn't matter how much "thread" is showing since it will be covered up.
I picked out a nice 3-dimensional flower trim and I didn't want to sew a straight stitch over it and flaten it down. So I used the same blind stitch again to sew the trim on.  I folded the trim in half and sewed straight down.  The trim is on the right in this picture because the long stitch was on the right had side this time.  Make sure that you check so that you don't sew too much down.
Here is a picture of the finished edge.  As you can see the flowers are nice and puffy.  :)

Attaching the Bodice to the Skirt
Bodice, skirt, and over skirt

11 and 15)  I didn't pin the over skirt and baste it to the skirt so I did everything all at once.
15a) I lined side seam up and pinned them in place.  Then I pinned the front part to where they should be when they are open.


15b) I then gathered the over skirt and pinned in place

15c)  Then I used a small zig zag stitch to stitch in place.  I used a zig zag to make sure that I caught all of the puckers and such.
15d) I repeated the same process for the skirt.  Remember the skirt goes on the outside when doing it this way.


Need to find my other digital camera for the rest of the pictures to finish with attaching the sleeves and such...

Just a general note on attaching the sleeves.  If I were to make this pattern again I would not attach the sleeve after the dress is finished, as stated in the directions.  Just way way too much material to be trying to stuff under the free arm.

I would attach the arms before I sewed the skirt onto the bodice.  Less fabric to deal with.